本次使用的Vivado, Petalinux版本均为v2021.1。记录下来方便自己和其他人之后参考。
1 Vivado部分
1.1 新建工程项目,FPGA选型器件为xc7z020clg400-2。
1.2 添加Block Design,加入Zynq7 Processing System IP核,并对IP核进行定制。
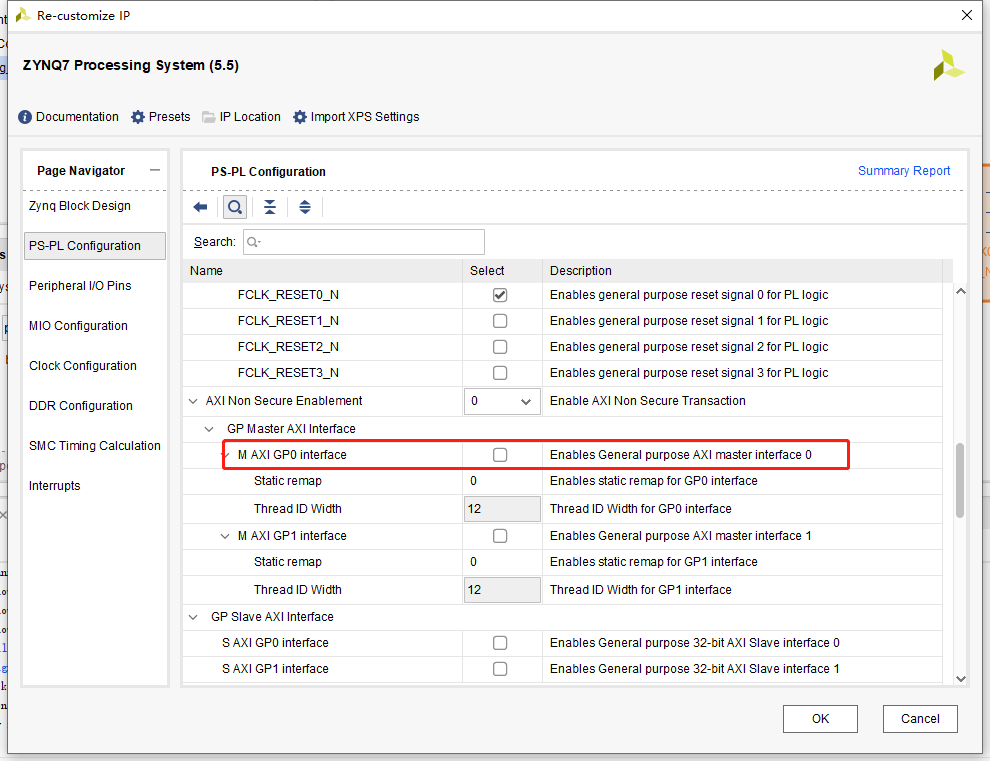
1.3 去除PS-PL Configuration->AXI Non Secure Enablement->GP Master AXI Interface->M AXI GP0 Interface的对勾,如图所示。
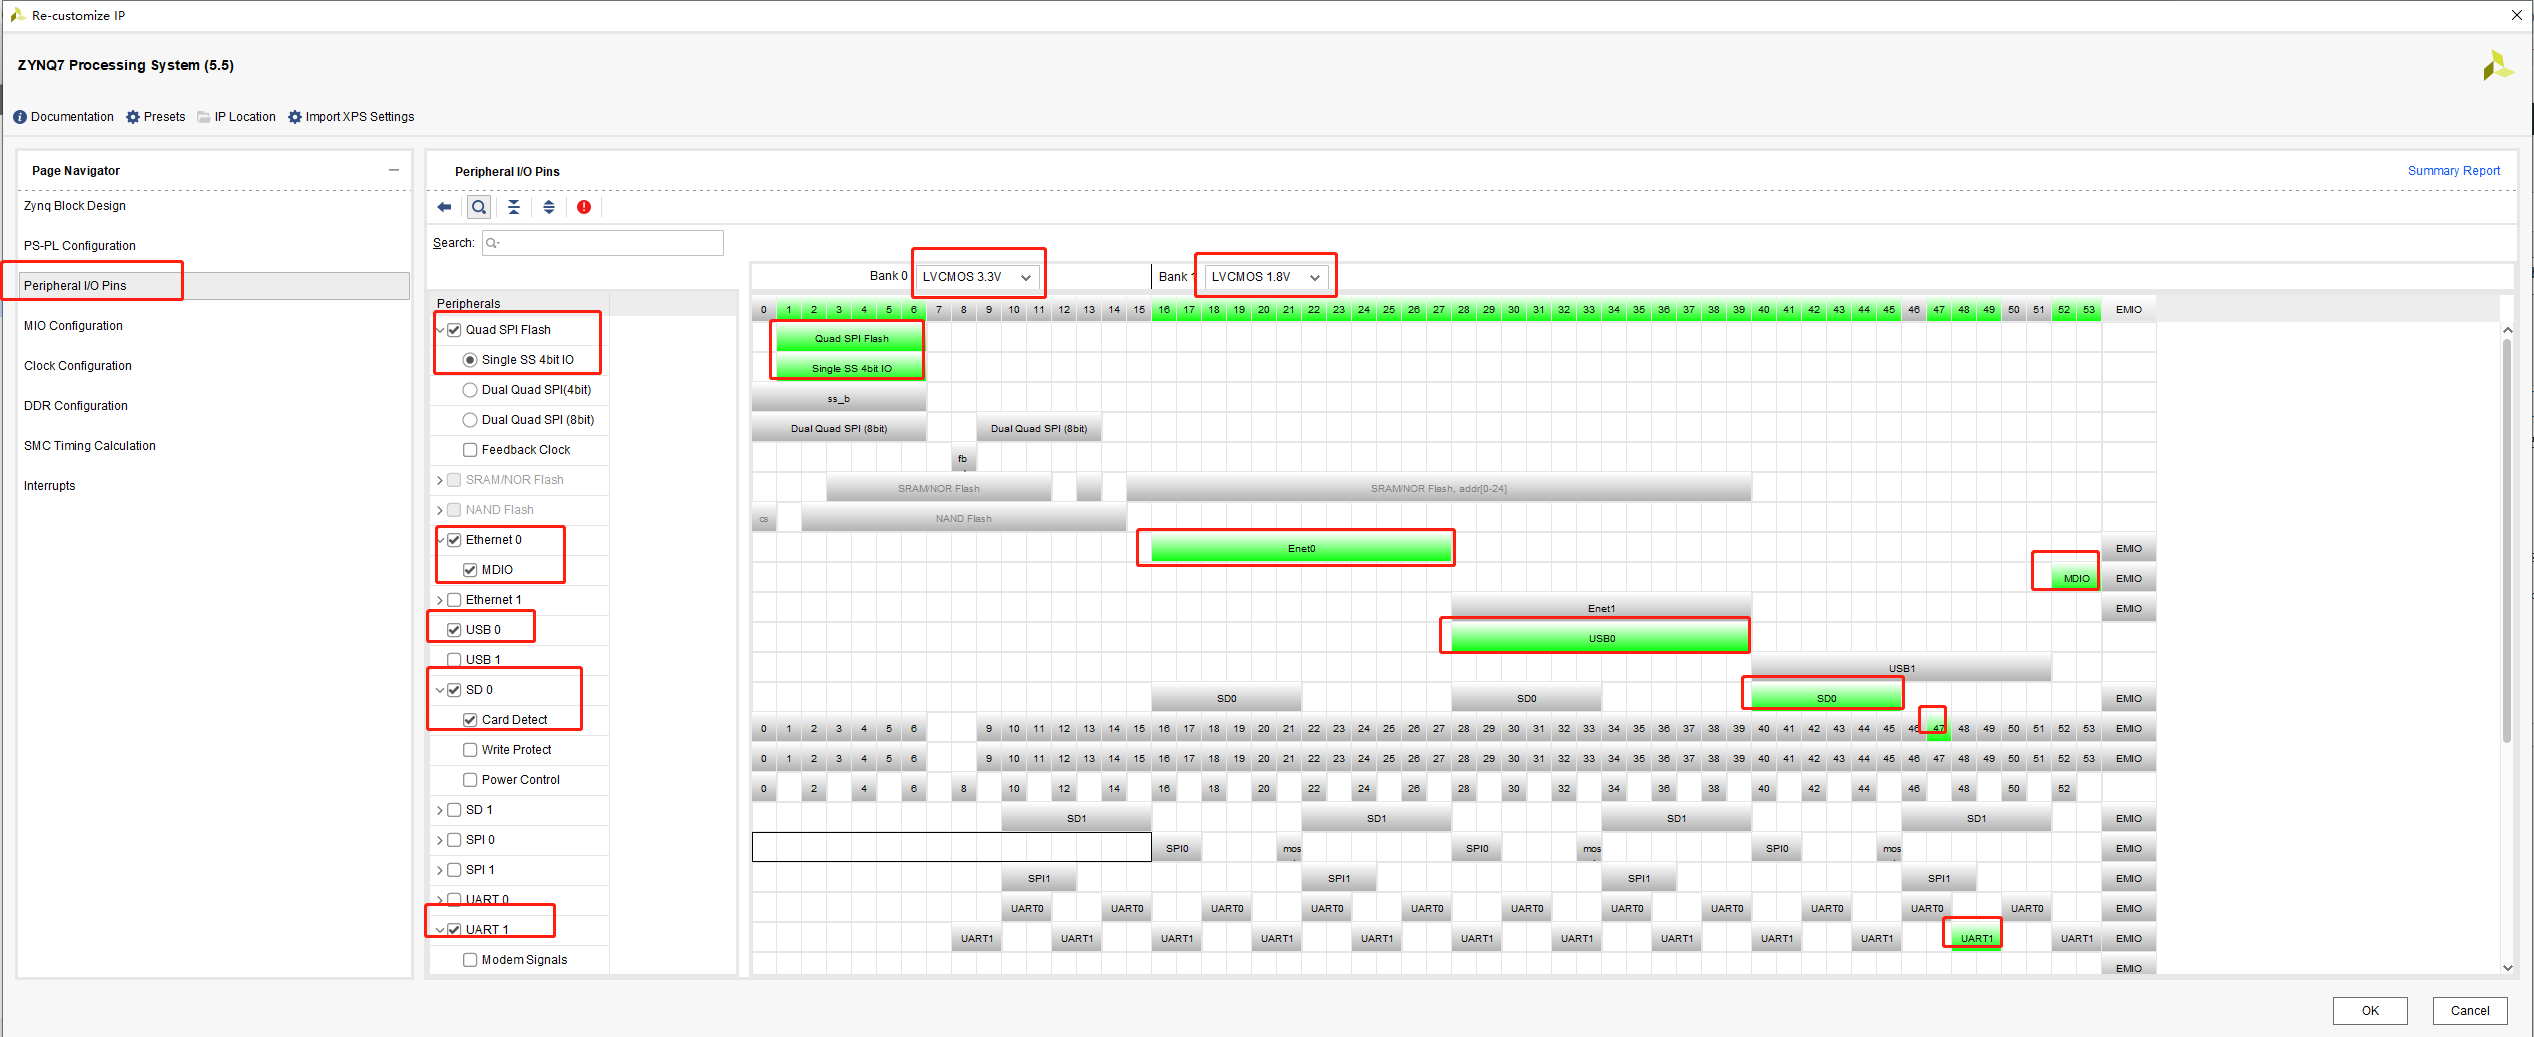
1.4 根据黑金AX7020提供的手册,按如图所示的配置配好Peripheral IO Pins。使能QSPI Flash,Ethernet 0,USB 0, SD 0,UART 1。对应的MIO从图中可以找到。配置两个Bank的电压。
1.5 根据黑金AX7020提供的手册,进入MIO Configuration,将Ethernet 0对应的IO Type和Speed分别改为HSTL 1.8V和Fast,否则可能无法正常上网。其他的选项无需改变。

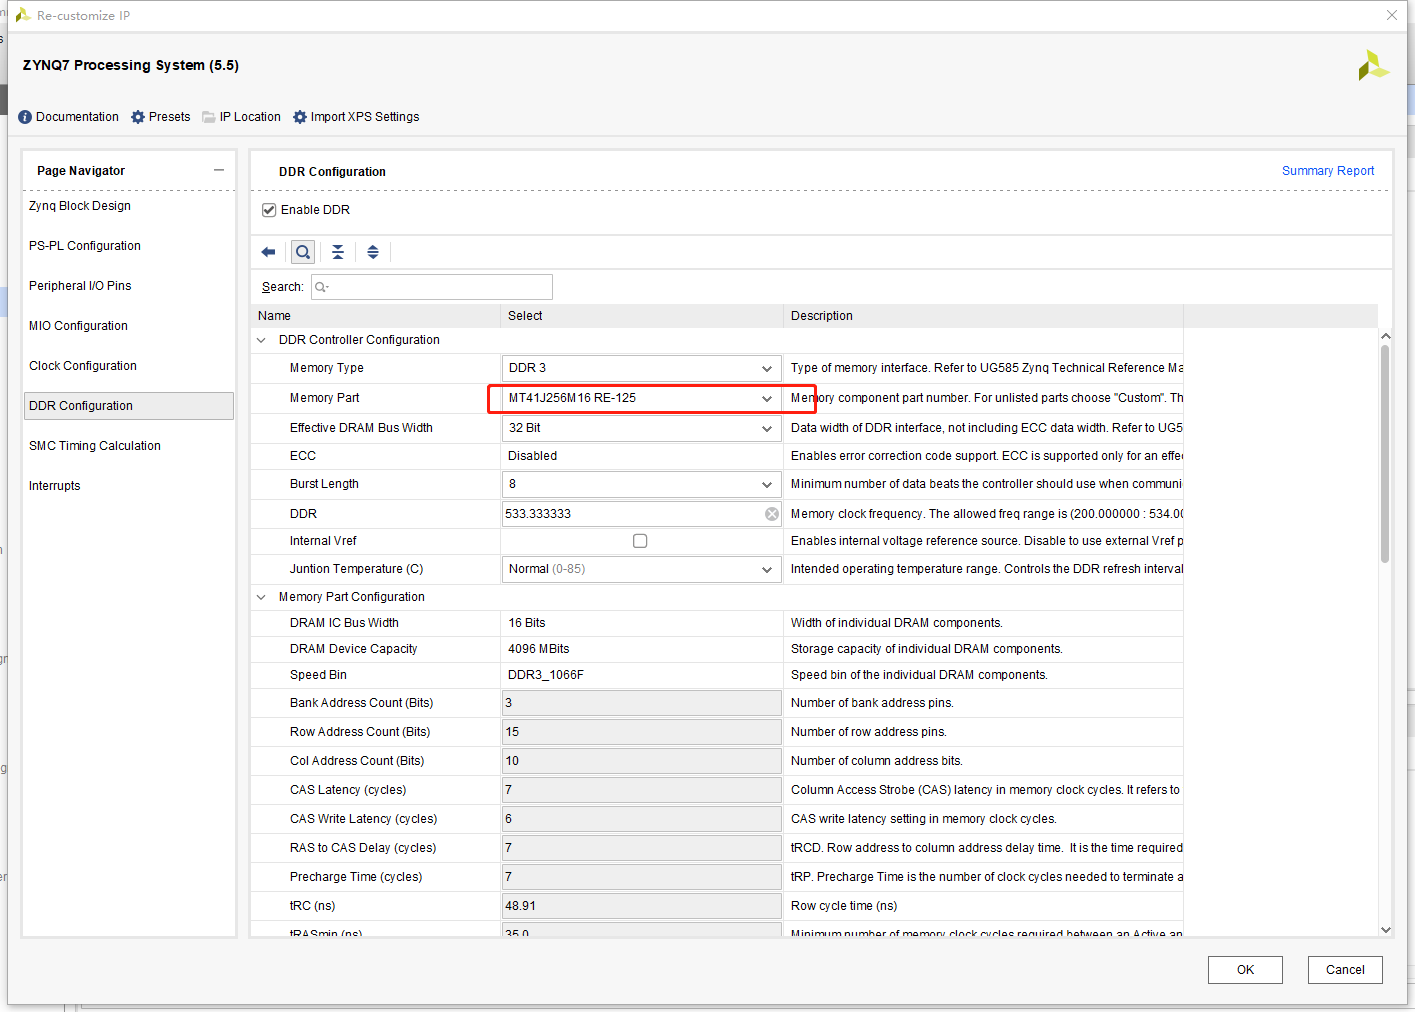
1.6 根据黑金AX7020提供的手册,进入DDR Configuration,将Memory Part修改为MT41J256M16 RE-125。
1.7 Create HDL Wrapper,Synthesis,Implementation, Gen Bitstream,Export Hardware With Bitstream导出硬件配置xsa文件备用。
2 Petalinux部分
这部分的工程需要在Linux完成,我采用Ubuntu 18.04安装Petalinux v2021.1。
2.1 使用source命令导入petalinux的可执行程序路径
2.2 新建工程:
1 | petalinux-create --type project --template zynq --name AX7020 |
2.3 进入工作目录:
1 | cd AX7020 |
2.4 复制硬件配置文件xsa到linux下并导入
1 | petalinux-config --get-hw-description bd_top_wrapper.xsa |
2.5 进行Petalinux的配置

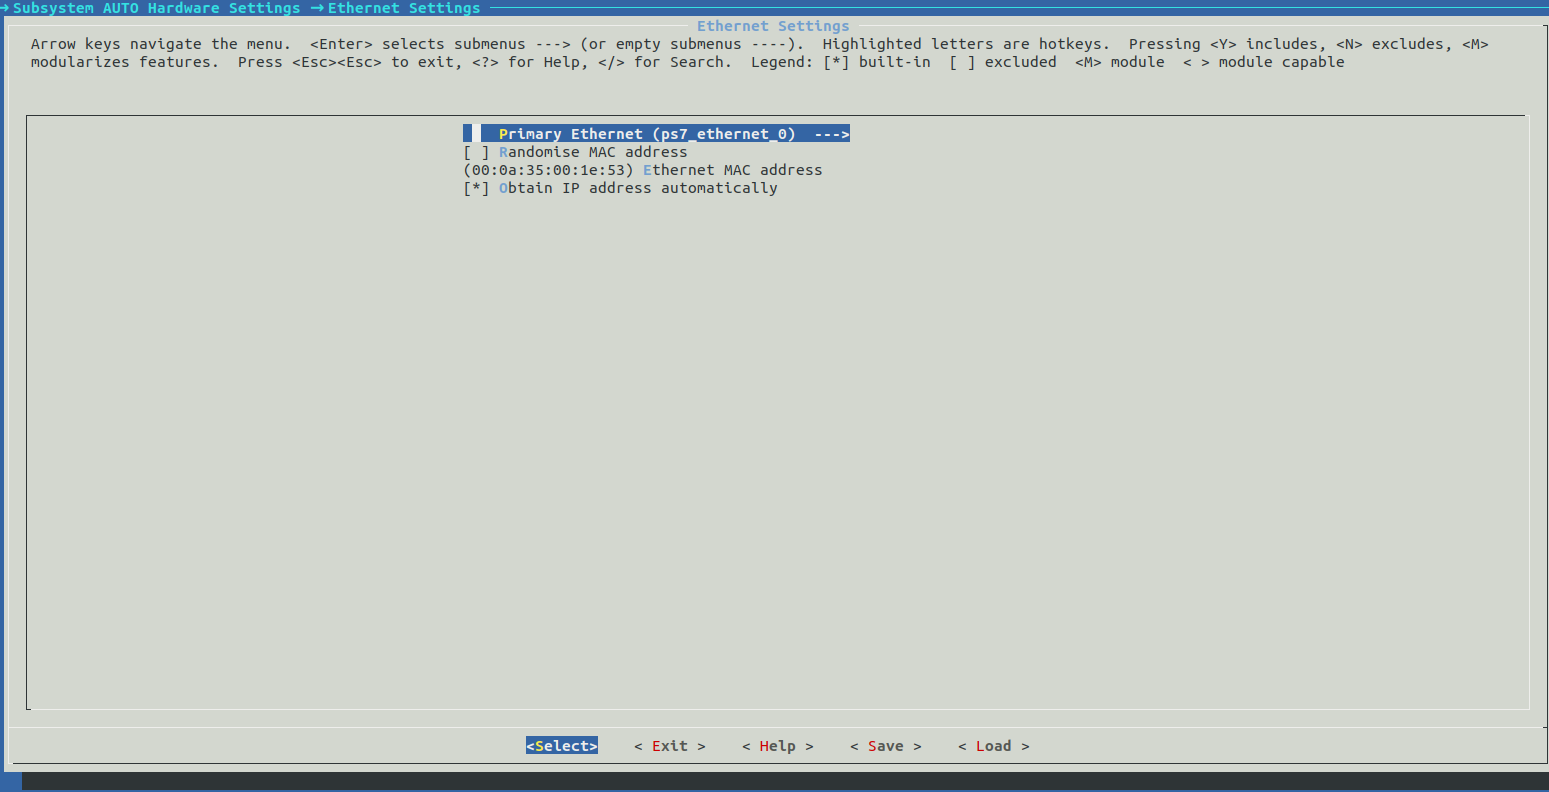
2.5.1 Subsystem AUTO Hardware Settings
进入Subsystem AUTO Hardware Settings,如有需要可以配置Ethener Settings中的MAC地址。其他选项可以保持默认不用动。
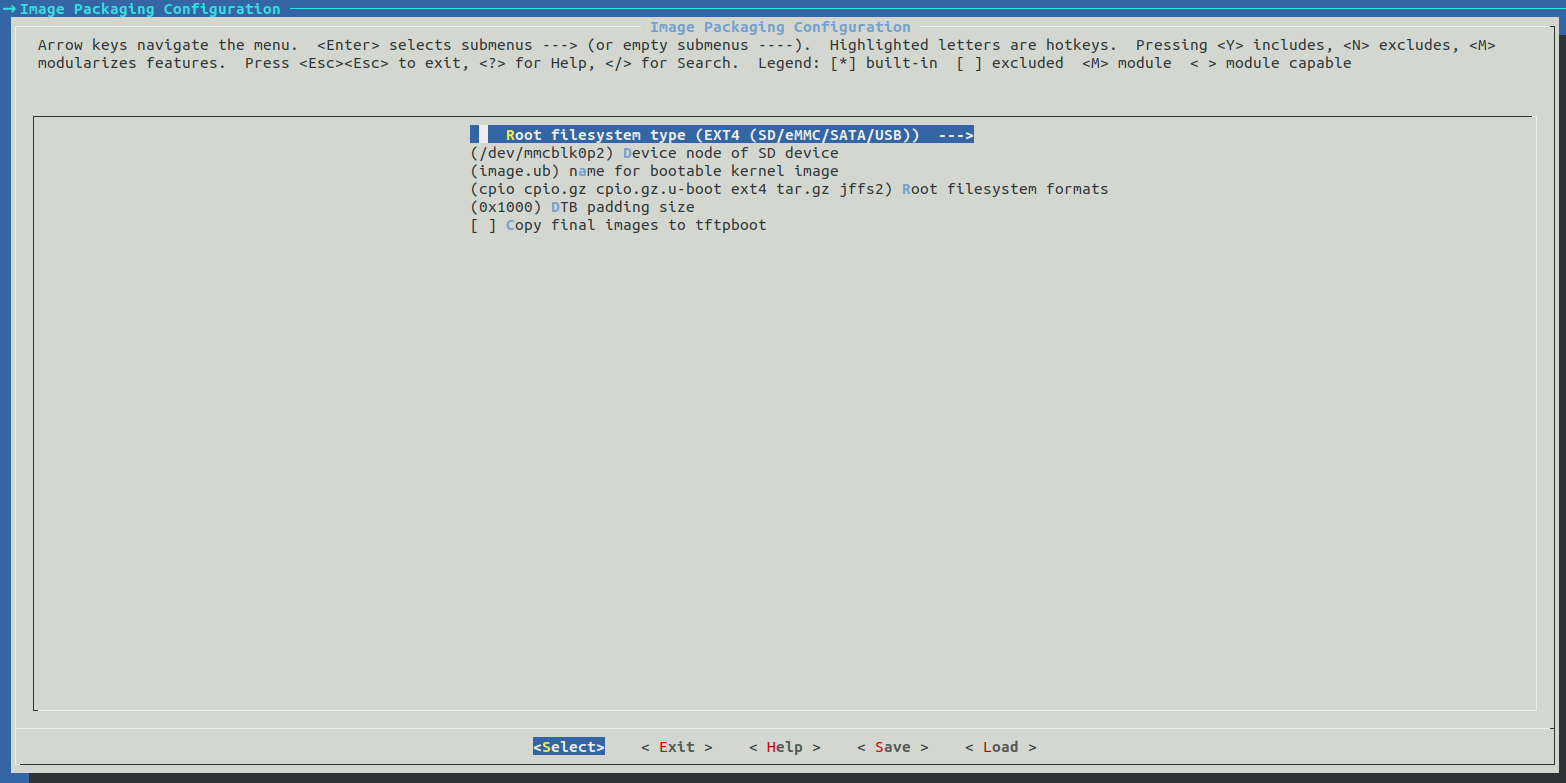
2.5.2 Image Packaging Configuration
进入Image Packaging Configuration,将Root filesystem type改为EXT4 (SD/eMMC/SATA/USB)。其他不用动。
2.6 进行u-boot的配置
老版本的Petalinux-config是可以通过Advanced bootable images storage Setting配置启动方式的,不知道为什么v2021.1没这个选项了,只能手动配置uboot了。
1 | petalinux-config -c u-boot |

进入Boot options->Enable a default value for bootcmd,改变bootcmd value为:
1 | fatload mmc 0:1 0x10000000 image.ub;bootm 0x10000000;run distro_bootcmd |
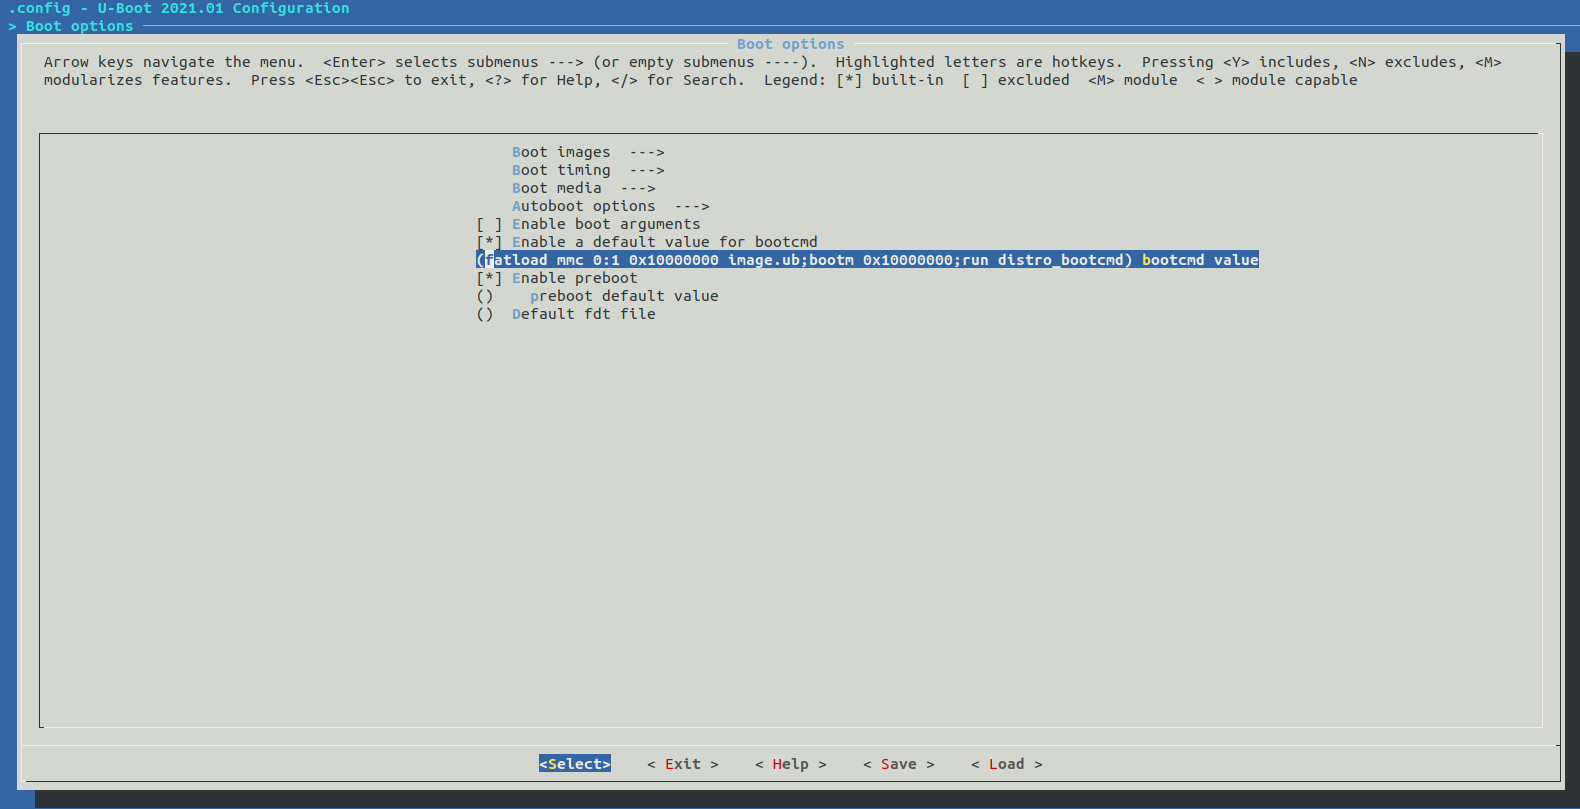
配置其从SD卡的image.ub内核启动。
2.7 编译
1 | petalinux-build |
2.8 生成BOOT.BIN和image.ub
1 | petalinux-package --boot --force --fsbl images/linux/zynq_fsbl.elf --fpga --u-boot |
在images/linux下会多出两个BOOT.BIN和image.ub。将这两个文件复制到SD卡的FAT分区,即可从SD卡启动。
SD卡应当有两个分区,首分区有Boot Flag,FAT格式,第二分区为EXT4,存放rootfs。在做rootfs的时候详细讲解。
3 rootfs部分
3.1 产生空白4G img映像,用来烧写文件系统
1 | dd if=/dev/zero of=AX7020_Ubuntu2004.img bs=1M count=4096 |
3.2 挂载映像
1 | sudo losetup -f --show AX7020_Ubuntu2004.img |
我的机器上,给我挂载到了/dev/loop31,下面都以loop31为例。
3.3 给映像分区
1 | sudo fdisk /dev/loop31 |
按照下列过程给磁盘分区:
1 2 3 4 5 6 7 8 9 10 11 12 13 14 15 16 17 18 19 20 21 22 23 24 25 26 27 28 29 30 31 32 33 34 35 36 37 38 39 40 41 42 43 44 45 46 47 48 49 50 51 52 53 54 55 56 57 58 59 60 61 62 63 64 65 66 67 68 69 70 71 72 73 74 75 76 77 78 79 80 81 82 83 84 85 86 87 88 89 90 91 92 93 94 95 96 97 98 99 100 101 102 103 104 105 106 107 108 109 110 111 112 113 114 115 116 117 118 119 120 121 122 123 124 125 126 127 128 | jack@ubuntu:~/AX7020/bootstrap$ sudo fdisk /dev/loop31 Welcome to fdisk (util-linux 2.31.1). Changes will remain in memory only, until you decide to write them. Be careful before using the write command. Device does not contain a recognized partition table. Created a new DOS disklabel with disk identifier 0xd7f57166. Command (m for help): p Disk /dev/loop31: 4 GiB, 4294967296 bytes, 8388608 sectors Units: sectors of 1 * 512 = 512 bytes Sector size (logical/physical): 512 bytes / 512 bytes I/O size (minimum/optimal): 512 bytes / 512 bytes Disklabel type: dos Disk identifier: 0xd7f57166 Command (m for help): n Partition type p primary (0 primary, 0 extended, 4 free) e extended (container for logical partitions) Select (default p): p Partition number (1-4, default 1): 1 First sector (2048-8388607, default 2048): 2048 Last sector, +sectors or +size{K,M,G,T,P} (2048-8388607, default 8388607): +64M Created a new partition 1 of type 'Linux' and of size 64 MiB. Command (m for help): p Disk /dev/loop31: 4 GiB, 4294967296 bytes, 8388608 sectors Units: sectors of 1 * 512 = 512 bytes Sector size (logical/physical): 512 bytes / 512 bytes I/O size (minimum/optimal): 512 bytes / 512 bytes Disklabel type: dos Disk identifier: 0xd7f57166 Device Boot Start End Sectors Size Id Type /dev/loop31p1 2048 133119 131072 64M 83 Linux Command (m for help): t Selected partition 1 Hex code (type L to list all codes): L 0 Empty 24 NEC DOS 81 Minix / old Lin bf Solaris 1 FAT12 27 Hidden NTFS Win 82 Linux swap / So c1 DRDOS/sec (FAT- 2 XENIX root 39 Plan 9 83 Linux c4 DRDOS/sec (FAT- 3 XENIX usr 3c PartitionMagic 84 OS/2 hidden or c6 DRDOS/sec (FAT- 4 FAT16 <32M 40 Venix 80286 85 Linux extended c7 Syrinx 5 Extended 41 PPC PReP Boot 86 NTFS volume set da Non-FS data 6 FAT16 42 SFS 87 NTFS volume set db CP/M / CTOS / . 7 HPFS/NTFS/exFAT 4d QNX4.x 88 Linux plaintext de Dell Utility 8 AIX 4e QNX4.x 2nd part 8e Linux LVM df BootIt 9 AIX bootable 4f QNX4.x 3rd part 93 Amoeba e1 DOS access a OS/2 Boot Manag 50 OnTrack DM 94 Amoeba BBT e3 DOS R/O b W95 FAT32 51 OnTrack DM6 Aux 9f BSD/OS e4 SpeedStor c W95 FAT32 (LBA) 52 CP/M a0 IBM Thinkpad hi ea Rufus alignment e W95 FAT16 (LBA) 53 OnTrack DM6 Aux a5 FreeBSD eb BeOS fs f W95 Ext'd (LBA) 54 OnTrackDM6 a6 OpenBSD ee GPT 10 OPUS 55 EZ-Drive a7 NeXTSTEP ef EFI (FAT-12/16/ 11 Hidden FAT12 56 Golden Bow a8 Darwin UFS f0 Linux/PA-RISC b 12 Compaq diagnost 5c Priam Edisk a9 NetBSD f1 SpeedStor 14 Hidden FAT16 <3 61 SpeedStor ab Darwin boot f4 SpeedStor 16 Hidden FAT16 63 GNU HURD or Sys af HFS / HFS+ f2 DOS secondary 17 Hidden HPFS/NTF 64 Novell Netware b7 BSDI fs fb VMware VMFS 18 AST SmartSleep 65 Novell Netware b8 BSDI swap fc VMware VMKCORE 1b Hidden W95 FAT3 70 DiskSecure Mult bb Boot Wizard hid fd Linux raid auto 1c Hidden W95 FAT3 75 PC/IX bc Acronis FAT32 L fe LANstep 1e Hidden W95 FAT1 80 Old Minix be Solaris boot ff BBT Hex code (type L to list all codes): c Changed type of partition 'Linux' to 'W95 FAT32 (LBA)'. Command (m for help): p Disk /dev/loop31: 4 GiB, 4294967296 bytes, 8388608 sectors Units: sectors of 1 * 512 = 512 bytes Sector size (logical/physical): 512 bytes / 512 bytes I/O size (minimum/optimal): 512 bytes / 512 bytes Disklabel type: dos Disk identifier: 0xd7f57166 Device Boot Start End Sectors Size Id Type /dev/loop31p1 2048 133119 131072 64M c W95 FAT32 (LBA) Command (m for help): n Partition type p primary (1 primary, 0 extended, 3 free) e extended (container for logical partitions) Select (default p): p Partition number (2-4, default 2): 2 First sector (133120-8388607, default 133120): Last sector, +sectors or +size{K,M,G,T,P} (133120-8388607, default 8388607): Created a new partition 2 of type 'Linux' and of size 4 GiB. Command (m for help): p Disk /dev/loop31: 4 GiB, 4294967296 bytes, 8388608 sectors Units: sectors of 1 * 512 = 512 bytes Sector size (logical/physical): 512 bytes / 512 bytes I/O size (minimum/optimal): 512 bytes / 512 bytes Disklabel type: dos Disk identifier: 0xd7f57166 Device Boot Start End Sectors Size Id Type /dev/loop31p1 2048 133119 131072 64M c W95 FAT32 (LBA) /dev/loop31p2 133120 8388607 8255488 4G 83 Linux Command (m for help): a Partition number (1,2, default 2): 1 The bootable flag on partition 1 is enabled now. Command (m for help): p Disk /dev/loop31: 4 GiB, 4294967296 bytes, 8388608 sectors Units: sectors of 1 * 512 = 512 bytes Sector size (logical/physical): 512 bytes / 512 bytes I/O size (minimum/optimal): 512 bytes / 512 bytes Disklabel type: dos Disk identifier: 0xd7f57166 Device Boot Start End Sectors Size Id Type /dev/loop31p1 * 2048 133119 131072 64M c W95 FAT32 (LBA) /dev/loop31p2 133120 8388607 8255488 4G 83 Linux Command (m for help): w The partition table has been altered. Calling ioctl() to re-read partition table. Re-reading the partition table failed.: Invalid argument The kernel still uses the old table. The new table will be used at the next reboot or after you run partprobe(8) or kpartx(8). |
同步分区:
1 | sudo kpartx -av /dev/loop31 |
格式化分区:
1 2 | sudo mkfs.vfat /dev/mapper/loop31p1 sudo mkfs.ext4 /dev/mapper/loop31p2 |
挂载:
1 2 3 | mkdir boot rootfs sudo mount /dev/mapper/loop31p1 boot sudo mount /dev/mapper/loop31p2 rootfs |
将BOOT.BIN和image.ub复制到boot文件夹中,就完成了启动分区的部署工作。
3.4 构建rootfs
3.4.1 安装所需软件
1 | sudo apt install qemu-user-static debootstrap |
3.4.2 配置最小系统
1 2 3 4 5 | sudo debootstrap --arch=armhf --foreign focal ./rootfs # Ubuntu 20 sudo cp -av /usr/bin/qemu-arm-static rootfs/usr/bin/ sudo chroot ./rootfs export LANG=C /debootstrap/debootstrap --second-stage |
3.4.3 配置apt source、安装软件
1 2 3 4 5 6 7 8 9 10 11 12 13 14 15 16 17 | apt install nano nano /etc/apt/sources.list deb http://mirrors.ustc.edu.cn/ubuntu-ports/ focal main multiverse restricted universe deb http://mirrors.ustc.edu.cn/ubuntu-ports/ focal-backports main multiverse restricted universe deb http://mirrors.ustc.edu.cn/ubuntu-ports/ focal-proposed main multiverse restricted universe deb http://mirrors.ustc.edu.cn/ubuntu-ports/ focal-security main multiverse restricted universe deb http://mirrors.ustc.edu.cn/ubuntu-ports/ focal-updates main multiverse restricted universe deb-src http://mirrors.ustc.edu.cn/ubuntu-ports/ focal main multiverse restricted universe deb-src http://mirrors.ustc.edu.cn/ubuntu-ports/ focal-backports main multiverse restricted universe deb-src http://mirrors.ustc.edu.cn/ubuntu-ports/ focal-proposed main multiverse restricted universe deb-src http://mirrors.ustc.edu.cn/ubuntu-ports/ focal-security main multiverse restricted universe deb-src http://mirrors.ustc.edu.cn/ubuntu-ports/ focal-updates main multiverse restricted universe apt update apt upgrade apt install sudo ifupdown net-tools ethtool udev wireless-tools iputils-ping resolvconf wget apt-utils wpasupplicant vim git gcc build-essential openssh-server |
3.4.4 更改root密码
1 | passwd root |
3.4.5 设置网络
1 2 3 4 5 6 7 | nano /etc/network/interfaces auto lo iface lo inet loopback allow-hotplug eth0 iface eth0 inet dhcp |
3.4.6 挂载目录
1 2 3 | nano /etc/fstab /dev/mmcblk0p1 /boot vfat defaults 0 0 |
3.5 烧录SD卡
1 2 3 4 5 | sudo umount ./boot sudo umount ./rootfs sudo kpartx -d /dev/loop31 sudo losetup -d /dev/loop31 gzip -k AX7020_Ubuntu2004.img # 压缩镜像 |
使用工具烧录到SD卡。可以通过COM口看到启动过程,支持SSH登录。
已经编译好的镜像下载:https://pan.renjikai.com/DiskImages/AX7020/AX7020_Ubuntu2004.img.gz
用户名和密码都是root。
参考:
[1] https://hhuysqt.github.io/zynq3/